Debian/Ubuntu 環境申請和套用 Let's Encrypt 免費 SSL 憑證教學
Let's Encrypt是由EFF、Mozilla基金會、Akamai和Cisco等等許多大公司及非營利組織於2014年共同創立的ISRG組織所成立的數位憑證認證機構,目標就是要讓網站可以免費、申請簡單與自動化流程的憑證服務,以可以推廣及加速全球網站採用HTTPS安全的加密傳輸協定。Let's Encrypt簽發的憑證有效期為90天,也就是說網站每接近3個月都需要重新更新一次憑證,但還好我們可以透過很多自動化的工具來定期更新憑證,基本上配置好相關設定後,就可以不用擔心憑證過期的問題。
本文教學將指引使用者如何在Debian/Ubuntu系統,及在Nginx或Apache網頁伺服器上申請與配置好SSL憑證。如果你使用其他的Linux發行版或者是其他的網頁伺服器,當然也是可以參考本教學,但在指令方面需要自行更改以調整至適用你自己系統的環境。本文教學所使用的憑證申請工具為Let's Encrypt官方所建議的Certbot ACME客戶端套件,包含憑證申請、設定、自動化更新都會使用此工具完成。
1)下載和安裝Certbot套件。
Step 1:先將Debian/Ubuntu系統的套件資訊更新到最新。
sudo apt update -y
Step 2:安裝Certbot套件。
Nginx伺服器
sudo apt install certbot python3-certbot-nginx -y
Apache伺服器
sudo apt install certbot python3-certbot-apache -y
2)設定好DNS的A Record和編輯好網頁伺服器的Config檔。
**Let's Encrypt在簽發憑證時,有提供多種的驗證方式,目前還有支援的驗證方式,分別有HTTP、DNS和TLS-ALPN,本文教學是使用HTTP驗證方式。
**在使用HTTP驗證方式申請Let's Encrypt SSL憑證之前,需要確定要申請憑證的域名或子域名的DNS A Record都有對應完成(能在外網正常解析)。
**Let's Encrypt在簽發憑證時是有一些限制的,例如:單個域名簽發數量等等或其他不同的限制,而Let's Encrypt官方也曾說過隨著時間未來會慢慢放鬆這些限制,因為這些限制可能會隨著時間而改變,所以筆者這邊就不細說這些限制了,請自行至Let's Encrypt-Rate Limits頁面查看有哪些限制。
Step 1:因是使用HTTP的驗證方式,故需要確定好網域的A Record都有對應完成。
**筆者本次教學要申請的憑證,分別為『imkjie.com』和『www.imkjie.com』,故分別會設定一筆A記錄與CNAME記錄。
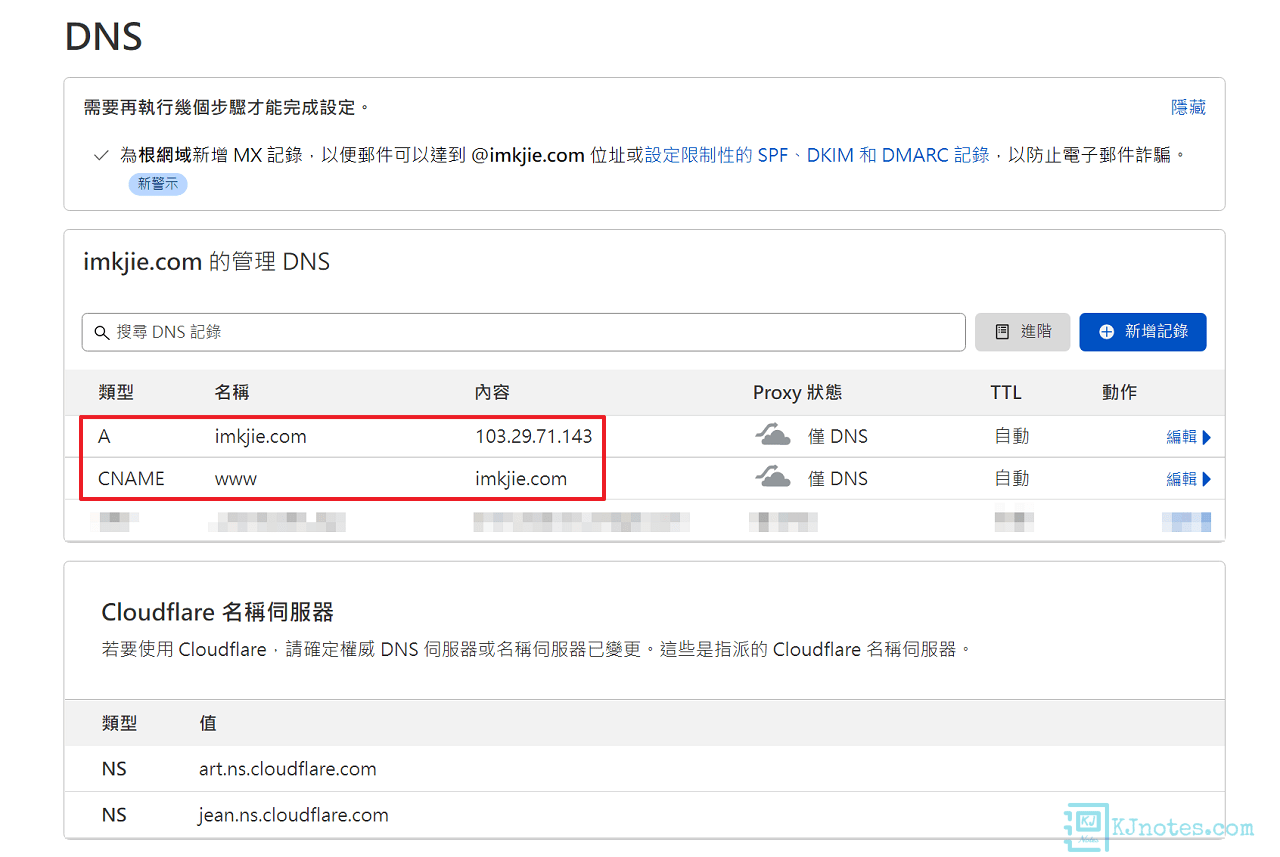
Step 2:編輯網頁伺服器的設定檔,以讓SSL憑證能正常簽發。
Nginx伺服器
步驟一:編輯Nginx設定檔,這邊的config檔路徑和名稱會跟大家不一樣,請自行設定你主機原有的config檔。以下指令筆者用Vim編輯器來設定自己的config檔。
sudo vim /etc/nginx/sites-available/<nginx-config>
步驟二:Certbot工具需要能在Nginx設定檔的『server』區塊中辨識到『server_name』的域名和你要申請的憑證一樣,比如筆者要申請的憑證為『imkjie.com』和『www.imkjie.com』,那config會是如下:
server {
    listen 80;
    listen [::]:80;
    ##Certbot會看的設定如下『server_name』
    server_name imkjie.com www.imkjie.com;
    root /var/www/kjnotes;

    # ...
}步驟三:測試Nginx設定檔,查看執行有沒有錯誤及重新載入Nginx的config檔。
sudo nginx -t
如看到以下的訊息,則表示此次設定是正確的:
nginx: the configuration file /etc/nginx/nginx.conf syntax is ok
nginx: configuration file /etc/nginx/nginx.conf test is successful
重新載入Nginx的config檔指令如下:
sudo systemctl reload nginx
步驟四:如下圖所示可以看到Chrome瀏覽器,因為還沒申請好憑證和設定好Nginx config檔,所以在網址列上看到『不安全』及也沒看到鎖頭。
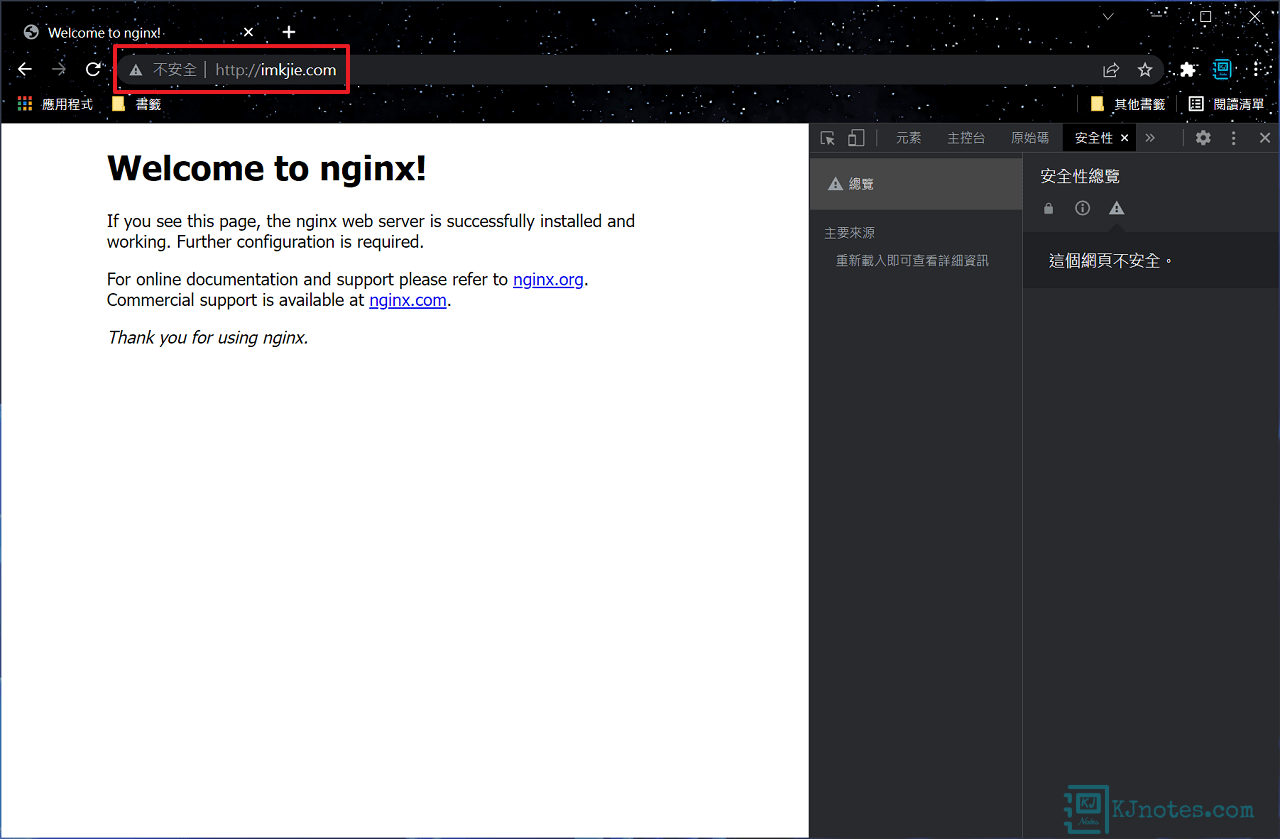
Apache伺服器
步驟一:編輯Apace設定檔,這邊的config檔路徑和名稱會跟大家不一樣,請自行設定你主機原有的config檔。以下指令筆者用Vim編輯器來編輯Vhost設定。
sudo vim /etc/apache2/sites-available/<apache-config>
步驟二:Certbot工具需要能在Apache設定檔的『VirtualHost』區塊中辨識到『ServerName』與『ServerAlias』的域名和你要申請的憑證一樣,比如筆者要申請的憑證為『imkjie.com』和『www.imkjie.com』,那config會是如下:
Listen 80
<VirtualHost *:80>
    ##Certbot會看的設定如下『ServerName』和『ServerAlias』
    ServerName imkjie.com
    ServerAlias www.imkjie.com
    DocumentRoot /var/www/kjnotes
    # ...
</VirtualHost>步驟三:測試Apache設定檔,查看執行有沒有錯誤及重新載入Apache的config檔。
sudo apache2ctl configtest
如看到以下的訊息,則表示此次設定是正確的:
Syntax OK重新載入Apache的config檔指令如下:
sudo systemctl reload apache2
步驟四:如下圖所示可以看到Chrome瀏覽器,因為還沒申請好憑證和設定好Apache config檔,所以在網址列上看到『不安全』及也沒看到鎖頭。
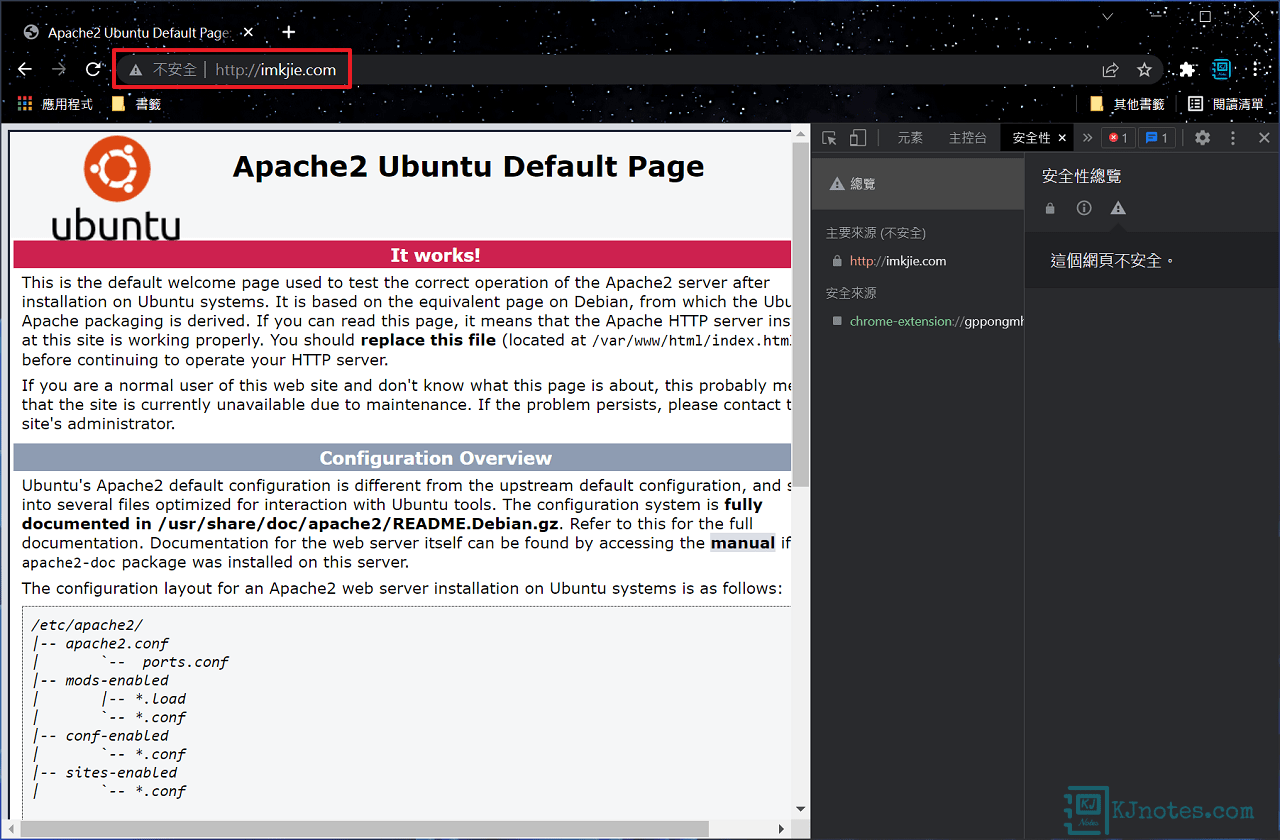
3)開始為域名申請SSL憑證。
Step 1:可以為域名申請憑證:
Nginx伺服器
步驟一:輸入以下指令來申請憑證,分別輸入你的電子郵件,同意Let's Encrypt相關的許可協議,及輸入要申請憑證的域名,域名的格式為『-d <第一組域名> -d <第二組域名> -d <第三組域名>』以此類推。
**下面的指令,請務必要將『email@example.com』更換成你的電子郵件地址,和『example.com』更換成要申請憑證的域名。
**填入Email的用意,若日後遇到憑證有異常(比如誤發,憑證機構需要撤銷受影響的憑證),那Let's Encrypt是會主動發Email通知,讓你提早知道憑證需要重新申請。
**下面是使用『certbot --nginx』方式取得憑證的指令,這指令可以讓Certbot工具協助設定Nginx的config檔:
sudo certbot --nginx --email email@example.com --agree-tos -d example.com -d www.example.com
**如果只需要申請憑證,那需加入『certonly』,指令為『certbot certonly --nginx』,後面的部分需自己手動設定Nginx的config檔;本文教學是使用下面這串指令:
sudo certbot certonly --nginx --email email@example.com --agree-tos -d example.com -d www.example.com
步驟二:申請過程可能會詢問一些問題,比如下面會詢問你是否需要收到Let's Encrypt組織相關的郵件,筆者這邊是選擇『n』。
demo@kjnotes:~$ sudo certbot certonly --nginx --email email@example.com --agree-tos -d imkjie.com -d www.imkjie.com
Saving debug log to /var/log/letsencrypt/letsencrypt.log

- - - - - - - - - - - - - - - - - - - - - - - - - - - - - - - - - - - - - - - -
Would you be willing, once your first certificate is successfully issued, to
share your email address with the Electronic Frontier Foundation, a founding
partner of the Let's Encrypt project and the non-profit organization that
develops Certbot? We'd like to send you email about our work encrypting the web,
EFF news, campaigns, and ways to support digital freedom.
- - - - - - - - - - - - - - - - - - - - - - - - - - - - - - - - - - - - - - - -
(Y)es/(N)o: n步驟三:憑證申請成功後,會出現『Successfully』成功的訊息,而申請成功的憑證會存放在『/etc/letsencrypt/live/example.com』目錄中。
**若憑證申請失敗,請先找出問題,因Let's Encrypt憑證在一定時間內申請會有次數限制,故先加入--dry-run指令來進行測試:
sudo certbot certonly --nginx --email email@example.com --agree-tos -d example.com -d www.example.com --dry-run
**下面範例筆者是使用『imkjie.com』和『www.imkjie.com』域名申請憑證成功訊息的過程:
Account registered.
Requesting a certificate for imkjie.com and www.imkjie.com

Successfully received certificate.
Certificate is saved at: /etc/letsencrypt/live/imkjie.com/fullchain.pem
Key is saved at:         /etc/letsencrypt/live/imkjie.com/privkey.pem
This certificate expires on 2025-05-15.
These files will be updated when the certificate renews.
Certbot has set up a scheduled task to automatically renew this certificate in the background.

Deploying certificate
Could not install certificate

NEXT STEPS:
- The certificate was saved, but could not be installed (installer: nginx). After fixing the error shown below, try installing it again by running:
  certbot install --cert-name imkjie.com

Could not automatically find a matching server block for imkjie.com. Set the `server_name` directive to use the Nginx installer.
Ask for help or search for solutions at https://community.letsencrypt.org. See the logfile /var/log/letsencrypt/letsencrypt.log or re-run Certbot with -v for more details.
Apache伺服器
步驟一:輸入以下指令來申請憑證,分別輸入你的電子郵件,同意Let's Encrypt相關的許可協議,及輸入要申請憑證的域名,域名的格式為『-d <第一組域名> -d <第二組域名> -d <第三組域名>』以此類推。
**下面的指令,請務必要將『email@example.com』更換成你的電子郵件地址,和『example.com』更換成要申請憑證的域名。
**填入Email的用意,若日後遇到憑證有異常(比如誤發,憑證機構需要撤銷受影響的憑證),那Let's Encrypt是會主動發Email通知,讓你提早知道憑證需要重新申請。
**下面是使用『certbot --nginx』方式取得憑證的指令,這指令可以讓Certbot工具協助設定Apache的config檔:
sudo certbot --apache --email email@example.com --agree-tos -d example.com -d www.example.com
**如果只需要申請憑證,那需加入『certonly』,指令為『certbot certonly --apache』,後面的部分需自己手動設定Apache的config檔;本文教學是使用下面這串指令:
sudo certbot certonly --apache --email email@example.com --agree-tos -d example.com -d www.example.com
步驟二:申請過程會詢問一些問題,比如下面會詢問你是否需要收到Let's Encrypt組織相關的郵件,筆者這邊是選擇『n』。
demo@kjnotes:~$ sudo certbot certonly --apache --email email@example.com --agree-tos -d imkjie.com -d www.imkjie.com
Saving debug log to /var/log/letsencrypt/letsencrypt.log

- - - - - - - - - - - - - - - - - - - - - - - - - - - - - - - - - - - - - - - -
Would you be willing, once your first certificate is successfully issued, to
share your email address with the Electronic Frontier Foundation, a founding
partner of the Let's Encrypt project and the non-profit organization that
develops Certbot? We'd like to send you email about our work encrypting the web,
EFF news, campaigns, and ways to support digital freedom.
- - - - - - - - - - - - - - - - - - - - - - - - - - - - - - - - - - - - - - - -
(Y)es/(N)o: n步驟三:憑證申請成功後,會出現『Successfully』成功的訊息,而申請成功的憑證會存放在『/etc/letsencrypt/live/example.com』目錄中。
**若憑證申請失敗,請先找出問題,因Let's Encrypt憑證在一定時間內申請會有次數限制,故先加入--dry-run指令來進行測試:
sudo certbot certonly --nginx --email email@example.com --agree-tos -d example.com -d www.example.com --dry-run
**下面範例筆者是使用『imkjie.com』和『www.imkjie.com』域名申請憑證成功訊息的過程:
Account registered.
Requesting a certificate for imkjie.com and www.imkjie.com

Successfully received certificate.
Certificate is saved at: /etc/letsencrypt/live/imkjie.com/fullchain.pem
Key is saved at:         /etc/letsencrypt/live/imkjie.com/privkey.pem
This certificate expires on 2025-05-15.
These files will be updated when the certificate renews.
Certbot has set up a scheduled task to automatically renew this certificate in the background.

Deploying certificate
Could not install certificate

NEXT STEPS:
- The certificate was saved, but could not be installed (installer: apache). After fixing the error shown below, try installing it again by running:
  certbot install --cert-name imkjie.com

Could not automatically find a matching server block for imkjie.com. Set the `ServerName` directive to use the Apache installer.
Ask for help or search for solutions at https://community.letsencrypt.org. See the logfile /var/log/letsencrypt/letsencrypt.log or re-run Certbot with -v for more details.
Step 2:憑證建立完成後,你可以使用如以下方式查看已簽發好的憑證,在/etc/letsencrypt/live/example.com目錄下,應該會看到『cert.pem』、『chain.pem』、『fullchain.pem』和『privkey.pem』4個不同的憑證檔案。
sudo ls -l /etc/letsencrypt/live
demo@kjnotes:~$ sudo ls -l /etc/letsencrypt/live
total 8
drwxr-xr-x 2 root root 4096 Feb  2 22:56 imkjie.com
-rw-r--r-- 1 root root  740 Feb  2 22:56 README
sudo ls -l /etc/letsencrypt/live/imkjie.com
demo@kjnotes:~$ sudo ls -l /etc/letsencrypt/live/imkjie.com
total 4
lrwxrwxrwx 1 root root  34 Feb  2 22:56 cert.pem -> ../../archive/imkjie.com/cert1.pem
lrwxrwxrwx 1 root root  35 Feb  2 22:56 chain.pem -> ../../archive/imkjie.com/chain1.pem
lrwxrwxrwx 1 root root  39 Feb  2 22:56 fullchain.pem -> ../../archive/imkjie.com/fullchain1.pem
lrwxrwxrwx 1 root root  37 Feb  2 22:56 privkey.pem -> ../../archive/imkjie.com/privkey1.pem
-rw-r--r-- 1 root root 692 Feb  2 22:56 README
Let's Encrypt簽發的4個不同憑證檔案分別為:
cert.pem:伺服器端的憑證(終端憑證);透過Let's Encrypt中續憑證產生和簽發給你的公鑰憑證。
chain.pem:Let's Encrypt的中續憑證。
fullchain.pem:此憑證包含了『cert.pem』和『chain.pem』兩個檔案的內容。
privkey.pem:憑證的私鑰。
4)網頁伺服器的HTTPS協定的設定。
Nginx伺服器
步驟一:編輯Nginx設定檔,這邊的config檔路徑和名稱會跟大家不一樣,請自行設定你主機原有的config檔。以下指令筆者用Vim編輯器來設定自己的config檔。
sudo vim /etc/nginx/sites-available/<nginx-config>
步驟二:設定Nginx HTTP自動轉址至HTTPS。
**下面的範例,請自行將『example.com』替換成你自己的域名。
server {
    listen 80;
    listen [::]:80;
    server_name example.com www.example.com;
    return 301 https://example.com$request_uri;
}步驟三:配置申請好的SSL憑證。
**下面的範例請自行將『root /var/www/example』替換至Nginx存放網頁的根目錄,及『example.com』替換成你自己的域名。
#HTTPS-有www轉址到沒有www
server {
    listen 443 ssl http2;
    listen [::]:443 ssl http2;
    server_name www.example.com;
    ssl_certificate /etc/letsencrypt/live/example.com/fullchain.pem;
    ssl_certificate_key /etc/letsencrypt/live/example.com/privkey.pem;
    ssl_ecdh_curve X25519:secp384r1;
    ssl_session_cache shared:SSL:50m;
    ssl_session_timeout 1440m;
    ssl_session_tickets off;
    ssl_protocols TLSv1.2 TLSv1.3;
    ssl_ciphers TLS13-AES-256-GCM-SHA384:TLS13-CHACHA20-POLY1305-SHA256:TLS13-AES-128-GCM-SHA256:TLS13-AES-128-CCM-8-SHA256:TLS13-AES-128-CCM-SHA256:EECDH+CHACHA20:EECDH+CHACHA20-draft:EECDH+ECDSA+AES128:EECDH+aRSA+AES128:RSA+AES128:EECDH+ECDSA+AES256:EECDH+aRSA+AES256:RSA+AES256:EECDH+ECDSA+3DES:EECDH+aRSA+3DES:RSA+3DES:!MD5;
    ssl_prefer_server_ciphers on;
    ssl_stapling on;
    ssl_stapling_verify on;
    ssl_trusted_certificate /etc/letsencrypt/live/example.com/chain.pem;
    add_header Strict-Transport-Security "max-age=31536000; preload";
    return 301 https://example.com$request_uri;
}
#HTTPS-沒有www-最終網址
server {
    listen 443 ssl http2;
    listen [::]:443 ssl http2;
    server_name example.com;
    root /var/www/html;
    ssl_certificate /etc/letsencrypt/live/example.com/fullchain.pem;
    ssl_certificate_key /etc/letsencrypt/live/example.com/privkey.pem;
    ssl_ecdh_curve X25519:secp384r1;
    ssl_session_cache shared:SSL:50m;
    ssl_session_timeout 1440m;
    ssl_session_tickets off;
    ssl_protocols TLSv1.2 TLSv1.3;
    ssl_ciphers TLS13-AES-256-GCM-SHA384:TLS13-CHACHA20-POLY1305-SHA256:TLS13-AES-128-GCM-SHA256:TLS13-AES-128-CCM-8-SHA256:TLS13-AES-128-CCM-SHA256:EECDH+CHACHA20:EECDH+CHACHA20-draft:EECDH+ECDSA+AES128:EECDH+aRSA+AES128:RSA+AES128:EECDH+ECDSA+AES256:EECDH+aRSA+AES256:RSA+AES256:EECDH+ECDSA+3DES:EECDH+aRSA+3DES:RSA+3DES:!MD5;
    ssl_prefer_server_ciphers on;
    ssl_stapling on;
    ssl_stapling_verify on;
    ssl_trusted_certificate /etc/letsencrypt/live/example.com/chain.pem;
    add_header Strict-Transport-Security "max-age=31536000; preload";

    # ...
}步驟四:測試Nginx設定檔,查看執行有沒有錯誤及重新載入Nginx的config檔。
sudo nginx -t
如看到以下的訊息,則表示此次設定是正確的:
nginx: the configuration file /etc/nginx/nginx.conf syntax is ok
nginx: configuration file /etc/nginx/nginx.conf test is successful
重新載入Nginx的config檔指令如下:
sudo systemctl reload nginx
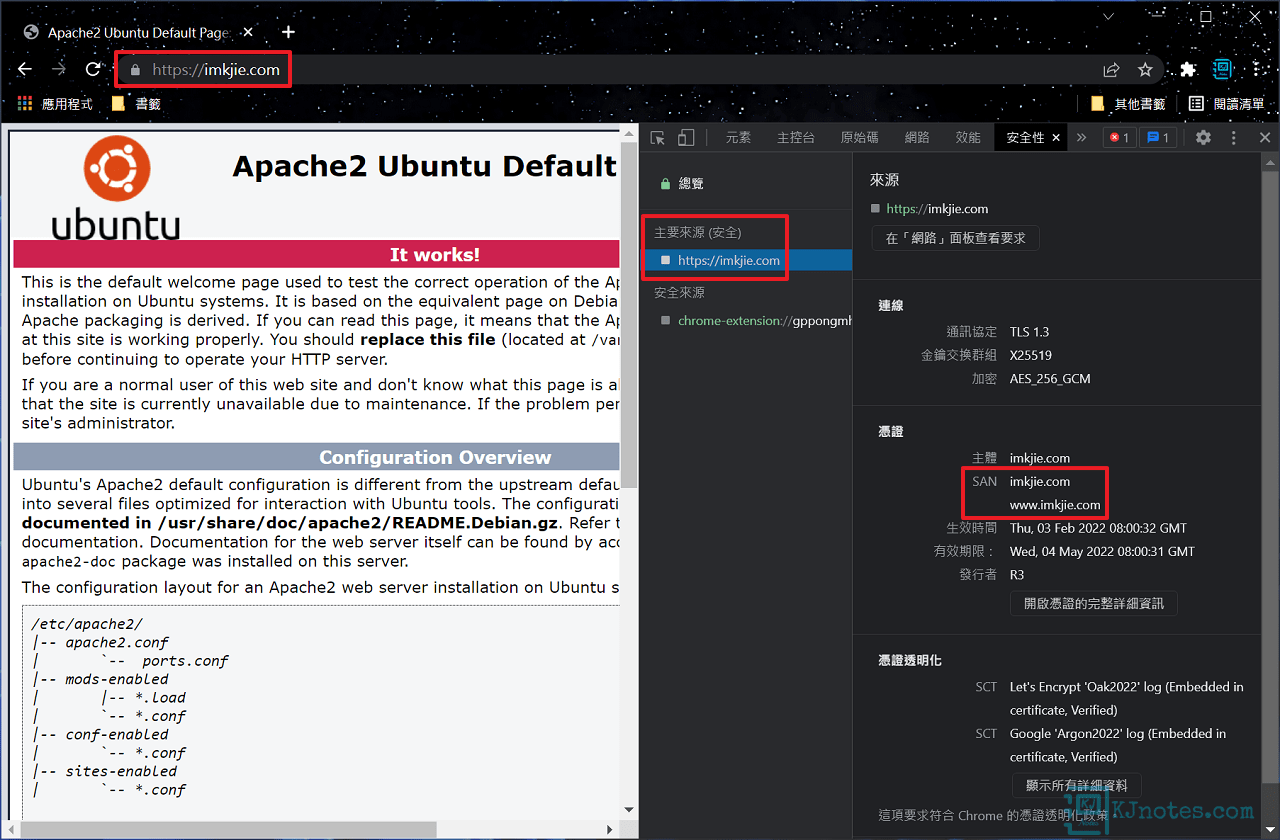
步驟五:在瀏覽器網址列輸入你設定的域名,就可以看到網址列有小鎖頭,則表示你網站已成功配置好HTTPS加密協定了。
**若主機有啟用防火牆,不要忘記要允許443 Port。
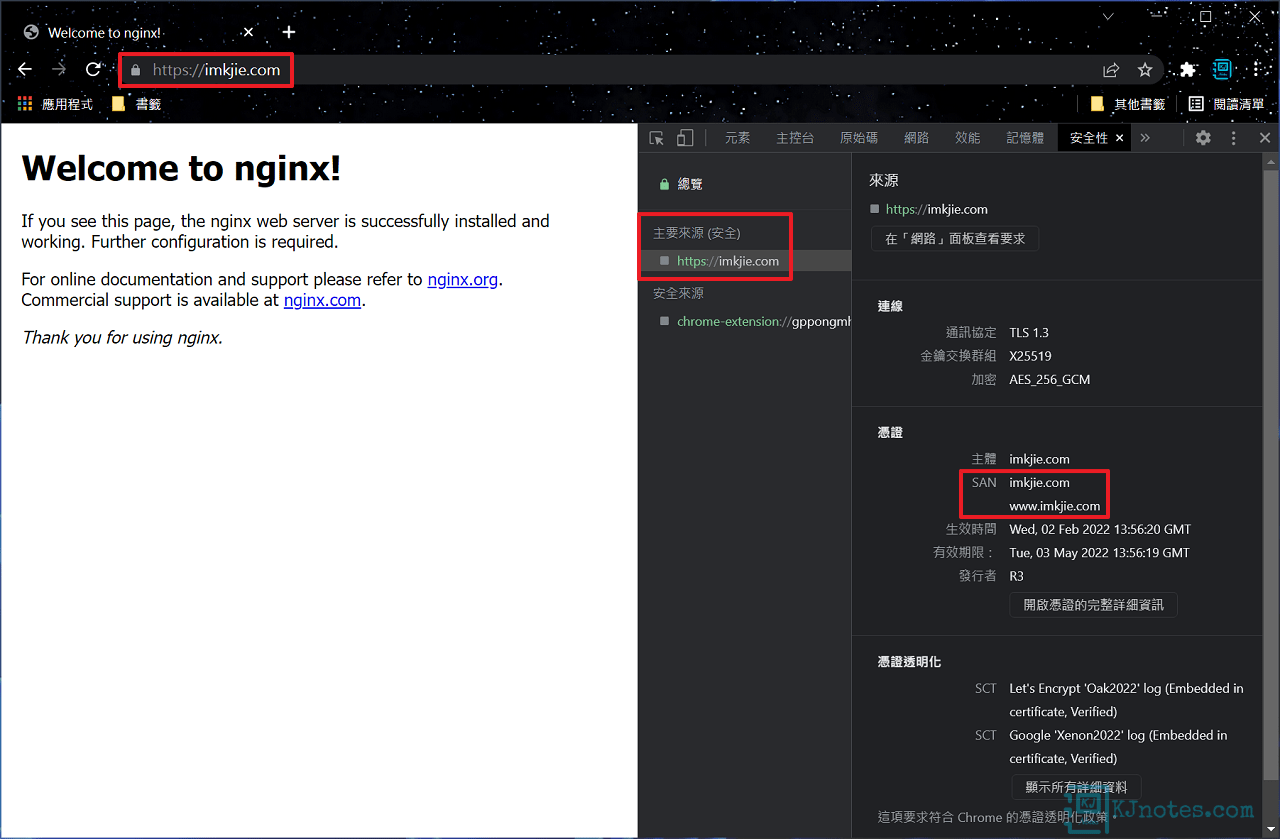
Apache伺服器
步驟一:編輯Apache設定檔,這邊的config檔路徑和名稱會跟大家不一樣,請自行設定你主機原有的config檔。以下指令筆者用Vim編輯器來設定自己的config檔。
sudo vim /etc/apache2/sites-available/<apache-config>
步驟二:設定Apache HTTP自動轉址至HTTPS。
**下面的範例,請自行將『example.com』替換成你自己的域名。
<VirtualHost *:80>
    ServerName example.com
    ServerAlias www.example.com
    Redirect permanent / https://example.com/
</VirtualHost>步驟三:配置申請好的SSL憑證。
**下面的範例請自行將『DocumentRoot /var/www/example』替換至Apache存放網頁的根目錄,及『example.com』替換成你自己的域名。
<VirtualHost *:443>
    ServerName example.com
    ServerAlias www.example.com

    #HTTPS-有www轉址到沒有www
    <If "%{HTTP_HOST} == 'www.example.com'">
        Redirect permanent / https://example.com/
    </If>

    DocumentRoot /var/www/example

    SSLEngine on
    SSLCertificateFile /etc/letsencrypt/live/example.com/cert.pem
    SSLCertificateKeyFile /etc/letsencrypt/live/example.com/privkey.pem
    SSLCertificateChainFile /etc/letsencrypt/live/example.com/chain.pem
    Protocols h2 http/1.1
    Header always set Strict-Transport-Security "max-age=31536000; preload"

    # ...

</VirtualHost>
SSLOpenSSLConfCmd Curves X25519:secp384r1
SSLSessionCache shmcb:/var/cache/mod_ssl/scache(512000)
SSLSessionCacheTimeout 300
SSLSessionTickets Off
SSLProtocol -all +TLSv1.2 +TLSv1.3
SSLCipherSuite TLS13-AES-256-GCM-SHA384:TLS13-CHACHA20-POLY1305-SHA256:TLS13-AES-128-GCM-SHA256:TLS13-AES-128-CCM-8-SHA256:TLS13-AES-128-CCM-SHA256:EECDH+CHACHA20:EECDH+CHACHA20-draft:EECDH+ECDSA+AES128:EECDH+aRSA+AES128:RSA+AES128:EECDH+ECDSA+AES256:EECDH+aRSA+AES256:RSA+AES256:EECDH+ECDSA+3DES:EECDH+aRSA+3DES:RSA+3DES:!MD5;
SSLHonorCipherOrder on
SSLCompression off
SSLUseStapling on
SSLStaplingResponderTimeout 5
SSLStaplingReturnResponderErrors off
SSLStaplingCache shmcb:logs/ssl_stapling(128000)
# ...步驟四:測試Apache設定檔,查看執行有沒有錯誤及重新載入Apache的config檔。
sudo apache2ctl configtest
若此主機的Apache伺服器未啟用過SSL服務,會看到『SSLEngine』和『Header』錯誤訊息,那須個別啟用以下的服務。
SSLEngine錯誤訊息:
demo@kjnotes:~$ sudo apache2ctl configtest
AH00526: Syntax error on line XX of /etc/apache2/sites-enabled/example.conf:
Invalid command 'SSLEngine', perhaps misspelled or defined by a module not included in the server configuration
Action 'configtest' failed.
The Apache error log may have more information.
sudo a2enmod ssl
demo@kjnotes:~$ sudo a2enmod ssl
Considering dependency setenvif for ssl:
Module setenvif already enabled
Considering dependency mime for ssl:
Module mime already enabled
Considering dependency socache_shmcb for ssl:
Enabling module socache_shmcb.
Enabling module ssl.
See /usr/share/doc/apache2/README.Debian.gz on how to configure SSL and create self-signed certificates.
To activate the new configuration, you need to run:
  systemctl restart apache2
Header錯誤訊息:
demo@kjnotes:~$ sudo apache2ctl configtest
AH00526: Syntax error on line XX of /etc/apache2/sites-enabled/example.conf:
Invalid command 'Header', perhaps misspelled or defined by a module not included in the server configuration
Action 'configtest' failed.
The Apache error log may have more information.
sudo a2enmod headers
demo@kjnotes:~$ sudo a2enmod headers
Enabling module headers.
To activate the new configuration, you need to run:
  systemctl restart apache2
如能看到以下的訊息,則表示此次設定是正確的:
Syntax OK重新載入Apache的config檔指令如下:
sudo systemctl reload apache2
步驟五:在瀏覽器網址列輸入你設定的域名,就可以看到網址列有小鎖頭,則表示你網站已成功配置好HTTPS加密協定了。
**若主機有啟用防火牆,不要忘記要允許443 Port。
5)使用第三方服務檢測網站的HTTPS配置和評分級別。
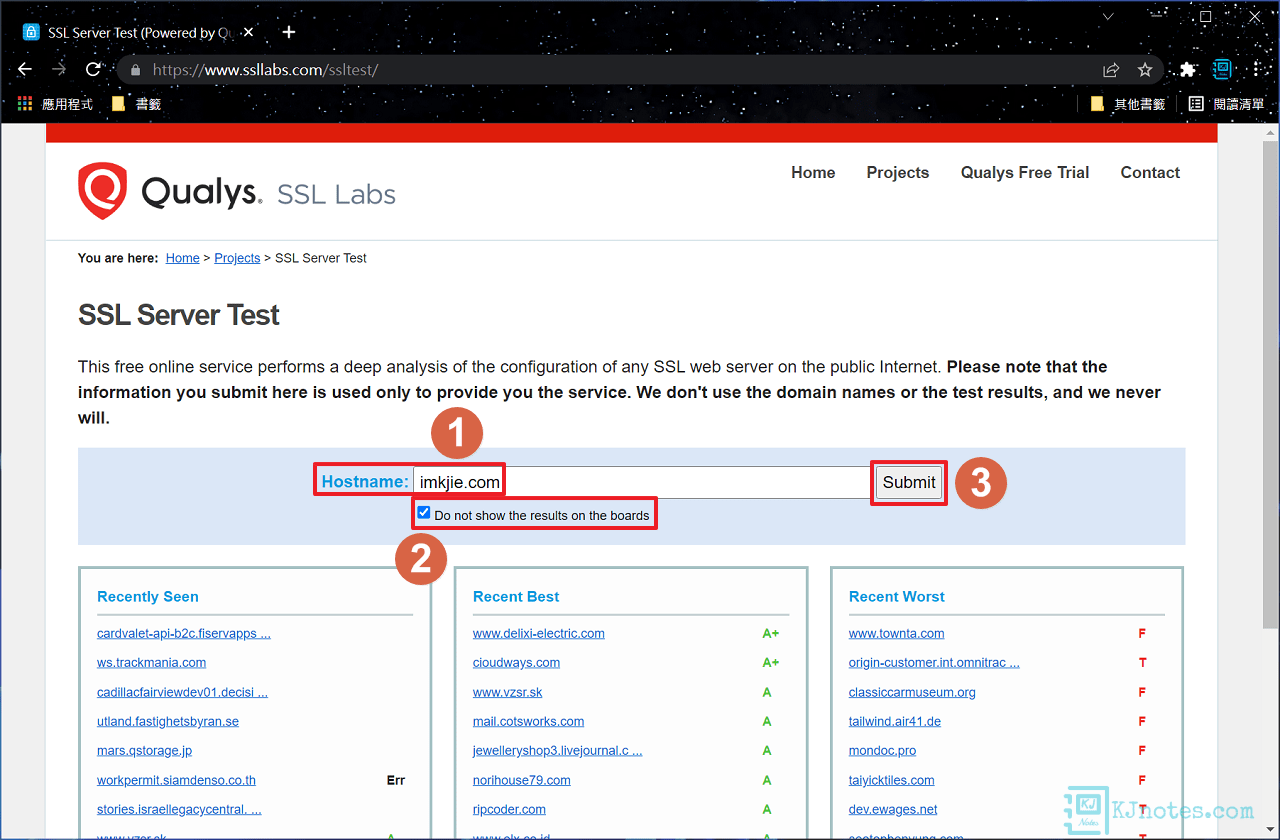
Step 1:如果想要進一步知道憑證是否有配置好,或憑證的相關資訊,那可以使用第三方服務Qualys SSL Labs提供的SSL Server Test來檢測網站的HTTPS配置和評分級別,在Hostname欄位輸入你要檢測網站的域名,可以打勾『Do not show the results on the boards』不要將測試結果的網域顯示在欄位上,點擊『Submit』進行測試。
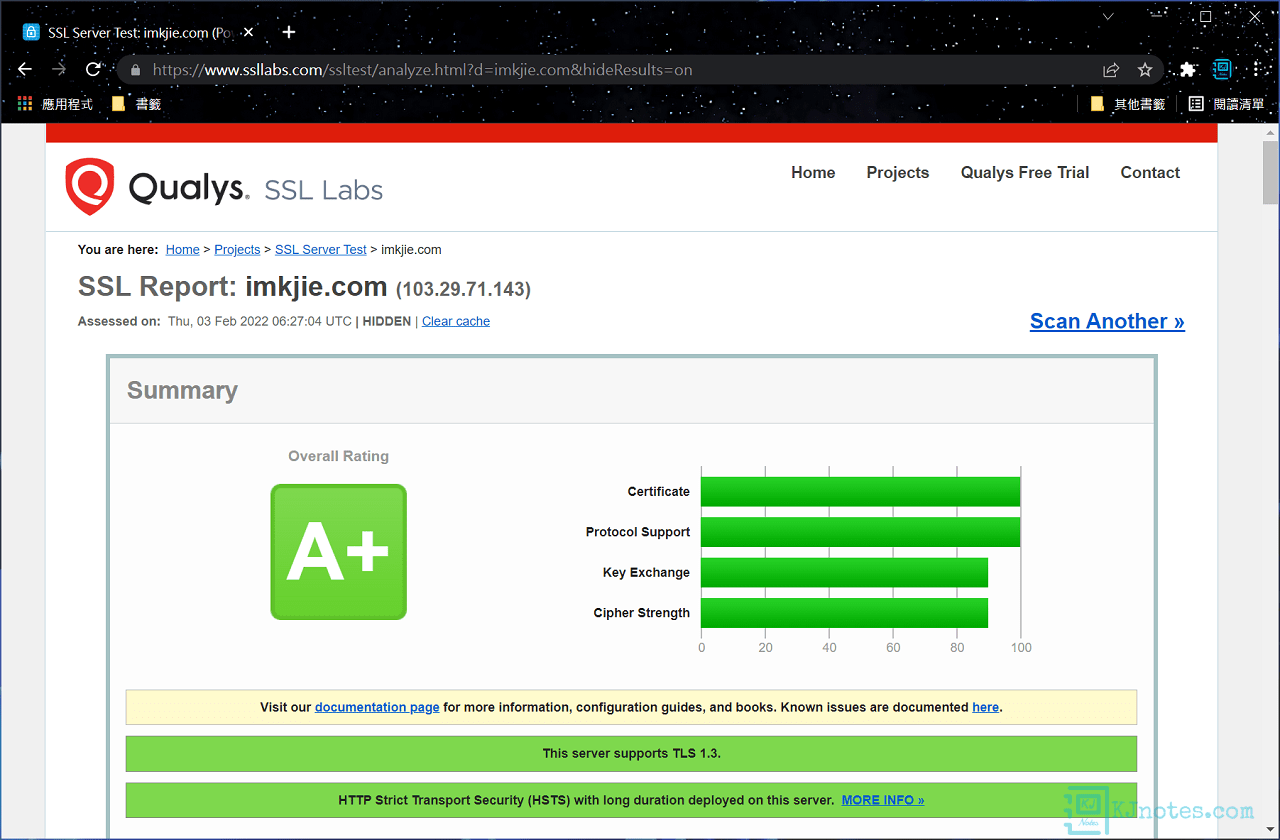
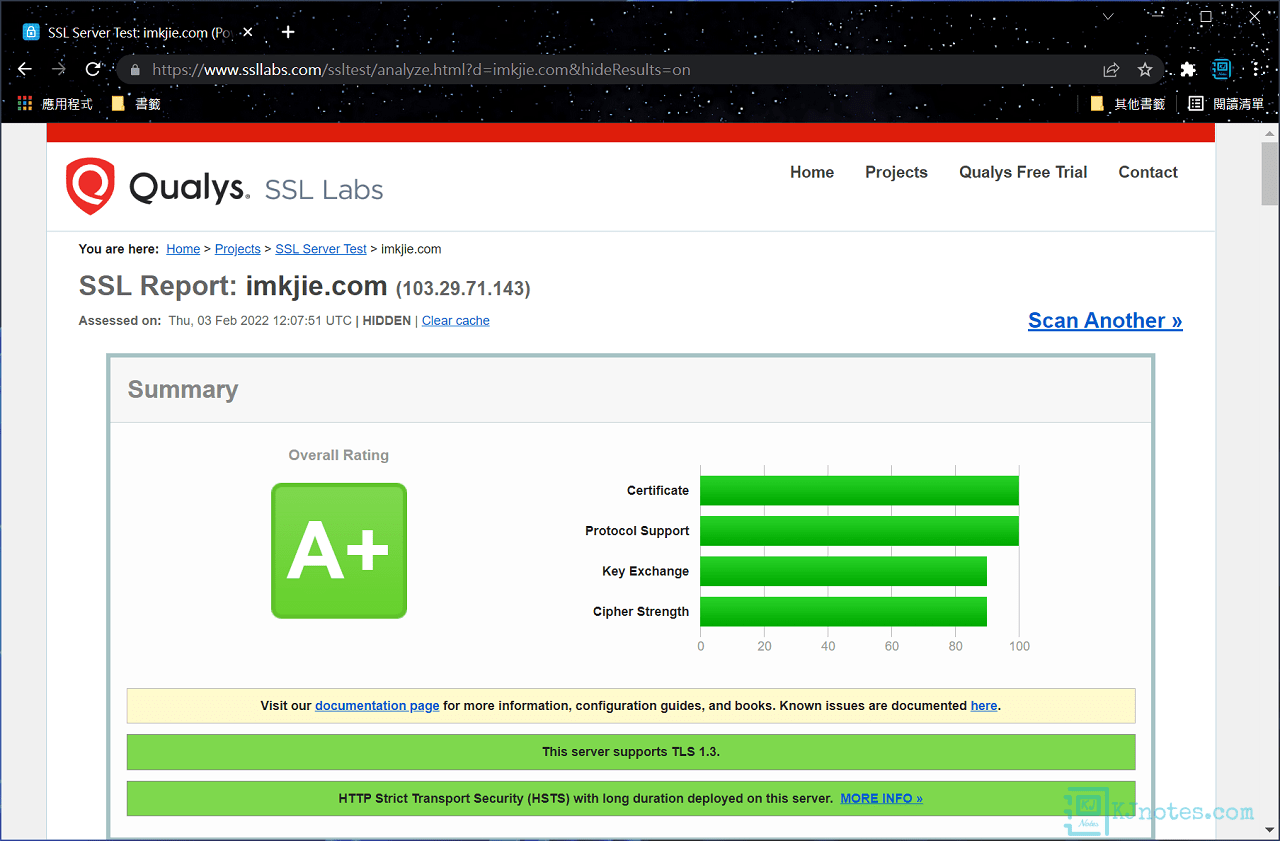
Step 2:需等待一些時間就可以看到測試結果了,如下圖所示可以看到筆者剛剛配置好的網站都有獲得A+級別的評分。
Nginx伺服器
Apache伺服器
6)檢查Certbot工具是否能自動更新Let's Encrypt憑證。
Step 1:Let's Encrypt簽發的憑證有效期為90天,也就是說網站每接近3個月都需要重新更新一次憑證,Certbot工具有提供自動更新憑證的服務,檢查頻率為每日兩次,若憑證有效期還有30天以上不會更新憑證,僅在小於30天才會自動更新憑證。以下指令可查看certbot.timer服務運行狀態:
sudo systemctl status certbot.timer
demo@kjnotes:~$ sudo systemctl status certbot.timer
● certbot.timer - Run certbot twice daily
     Loaded: loaded (/lib/systemd/system/certbot.timer; enabled; vendor preset: enabled)
     Active: active (waiting) since Thu 2022-02-03 16:48:30 CST; 47min ago
    Trigger: Fri 2022-02-04 08:45:13 CST; 15h left
   Triggers: ● certbot.service
Feb 03 16:48:30 kjnotes systemd[1]: Started Run certbot twice daily
Step 2:若需要測試憑證的更新,可使用Certbot指令執行憑證的更新。
sudo certbot renew --dry-run
因筆者的憑證有效期還超過一個月,可看到如下的返回結果訊息為『Congratulations,』;若執行失敗,也可以從這邊看到錯誤訊息,下面是測試正常的例子:
demo@kjnotes:~$ sudo certbot renew --dry-run
Saving debug log to /var/log/letsencrypt/letsencrypt.log

- - - - - - - - - - - - - - - - - - - - - - - - - - - - - - - - - - - - - - - -
Processing /etc/letsencrypt/renewal/imkjie.com.conf
- - - - - - - - - - - - - - - - - - - - - - - - - - - - - - - - - - - - - - - -
Simulating renewal of an existing certificate for imkjie.com and www.imkjie.com

- - - - - - - - - - - - - - - - - - - - - - - - - - - - - - - - - - - - - - - -
Congratulations, all simulated renewals succeeded:
  /etc/letsencrypt/live/imkjie.com/fullchain.pem (success)
- - - - - - - - - - - - - - - - - - - - - - - - - - - - - - - - - - - - - - - -
Step 3:若要查看主機有申請了哪些域名的憑證,及到期日期和天數,可使用以下指令:
sudo certbot certificates
demo@kjnotes:~$ sudo certbot certificates
Saving debug log to /var/log/letsencrypt/letsencrypt.log
- - - - - - - - - - - - - - - - - - - - - - - - - - - - - - - - - - - - - - - -
Found the following certs:
  Certificate Name: imkjie.com
    Domains: imkjie.com www.imkjie.com
    Expiry Date: 2022-05-04 08:00:31+00:00 (VALID: 89 days)
    Certificate Path: /etc/letsencrypt/live/imkjie.com/fullchain.pem
    Private Key Path: /etc/letsencrypt/live/imkjie.com/privkey.pem
- - - - - - - - - - - - - - - - - - - - - - - - - - - - - - - - - - - - - - - -
7)使用『--dry-run』指令則可使用測試環境。
**若憑證申請失敗,請勿再繼續申請,因Let's Encrypt憑證在一定時間內申請會有次數限制,Certbot有提供『--dry-run』指令讓憑證的申請可以先在測試環境進行測試,雖然測試環境也有次數限制,但提供憑證申請的次數更多,故可以先找出憑證申請失敗的原因,並將其改善,及再次使用測試環境申請確定沒問題後,才使用一般方式申請憑證。
Step 1:若需使用測試環境,申請憑證的指令中只需帶有『--dry-run』,即可使用測試環境。
sudo certbot certonly --nginx --email email@example.com --agree-tos -d example.com -d www.example.com --dry-run
Step 2:如下面測試環境所示,可看到憑證申請失敗的Detail原因為『Timeout during connect (likely firewall problem)』可能為防火牆造成的例子。
**請善用關鍵字並配合搜尋引擎以搜尋網路資料來解決憑證無法申請順利的原因。
demo@kjnotes:~$ sudo certbot certonly --nginx --email email@example.com --agree-tos -d imkjie.com --dry-run
Saving debug log to /var/log/letsencrypt/letsencrypt.log
Account registered.
Simulating a certificate request for imkjie.com
Certbot failed to authenticate some domains (authenticator: nginx). The Certificate Authority reported these problems:
  Domain: imkjie.com
  Type:   connection
  Detail: XXX.XXX.XXX.XXX: Fetching http://imkjie.com/.well-known/acme-challenge/1nc1C8VZ5eScay-uKuNgoCm52-ng_Z5-_l31V23iLGc: Timeout during connect (likely firewall problem)
Hint: The Certificate Authority failed to verify the temporary nginx configuration changes made by Certbot. Ensure the listed domains point to this nginx server and that it is accessible from the internet.
Some challenges have failed.
Ask for help or search for solutions at https://community.letsencrypt.org. See the logfile /var/log/letsencrypt/letsencrypt.log or re-run Certbot with -v for more details.
Step 3:若有將問題修正好,比如筆者已將防火牆問題處理好,則可看到『The dry run was successful.』成功的訊息,就能回到上面的第三部分教學以完成憑證的申請。
demo@kjnotes:~$ sudo certbot certonly --nginx --email email@example.com --agree-tos -d imkjie.com --dry-run
Saving debug log to /var/log/letsencrypt/letsencrypt.log
Simulating a certificate request for imkjie.com
The dry run was successful.
8)其他資源補充:
Certbot官方網站,可以查看其他系統和網頁伺服器如何使用Certbot工具安裝Let's Encrypt憑證。
Certbot工具的官方文檔資源。
Mozilla有提供Mozilla SSL Configuration Generator線上的SSL範例配置產生器,提供不同的軟體配置SSL範例,你可以參考此產生器來為伺服器選擇最適合的SSL配置。
